Data Recording Unit for SfM-based Mapping
For a while now, I’ve wanted to utilise structure from motion (SfM) methods for some computer vision applications. I’ve always found the basic idea behind it very fascinating; no need for multiple cameras, simply use several images from the same camera in different positions! OpenCV has an SfM module, so all I’ve been missing is a relevant usecase and suitable data. Now I figured it would be interesting to apply SfM to pointcloud mapping applications. Extracting pointclouds with SfM, the mapping part could be done with for example PCL. For this purpose I decided to build a wearable recording unit. As usual, code is available in my github.
The Recording Unit
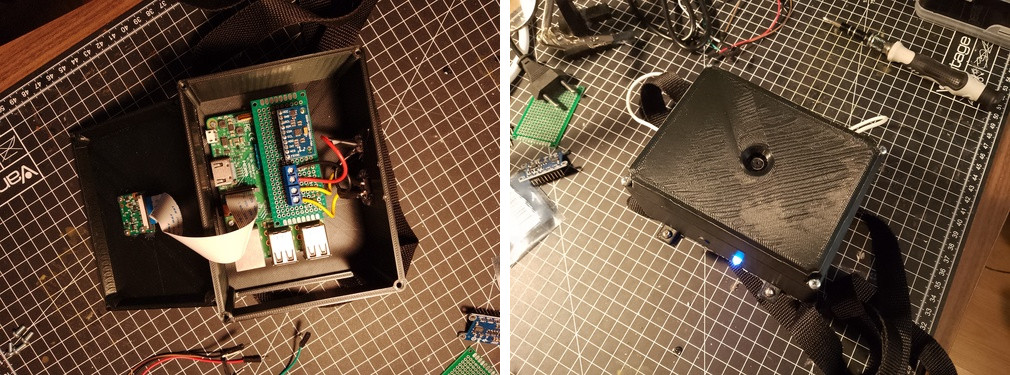
The unit consists of a Raspberry Pi 3, Raspberry Pi camera, MPU9250 IMU breakout board, self-soldered connector board, a status LED, a button for starting/stopping recording, a 3D-printed case, and a power bank attached to the back. The soldered connector board is pretty crude, I know, but that will be replaced with an actual PCB in case initial tests go without issues. I added the IMU to the unit to enable some possibilities for sensor fusion. SfM-based localisation should be quite prone to outliers in certain environments, much like any method based on finding point correspondences. I have a feeling the IMU will prove quite useful, even with minimal processing. Since the used sensors are readily available in a smartphone, I was initially thinking of using my phone for data capturing. However, after a bit of poking around, I decided that I don’t want to deal with any possible issues related video stabilisation applied in nearly all phones. The stabilisation will effectively change the camera properties, ruining the geometrical assumptions of SfM-algorithms.
Upon start-up, the recording script is initiated via a cronjob. This is achieved by editing crontab, typing in console
crontab -e
and adding the line
@reboot sleep 10; cd map_cap && python3 capture.py
Now upon start-up, the cronjob initiates the requested command. The initial sleep is added to ensure the OS has finished all starting operations.
Once the recording script is started, the actual data collection is started with pressing the button. During collection, a button press will end the collection and close the files. The included LED indicates the data collection status.
The unit is intended to be worn by the straps attached to the back. This allows convenient mapping in large outdoor areas. Yes, I know it looks quite ridiculous, but at least it’s practical. Form follows function!

Video Recording
One neat feature I discovered upon writing the code for the unit, was the custom outputs of the PiCamera library.
My implementation of a custom output can be seen in the video.py file.
Since I needed the timestamps for the frames, writing the encoded video stream straight to a file was not an option.
Initially I thought I would have to resort to extracting images from the camera by decoding each frame, as most people seem to use the camera.
This would have required me to create a custom thread for capturing, as I would have needed to decode each frame, and then encode it again.
However, the custom output allowed me a ready-made threaded option to get the encoded stream, record a timestamp for each frame, and write the encoded frame to a stream container as is.